Photoshop is, without a doubt, one of the best photo editors that have ever been made, making it easy to see why it’s also one of the most popular. It’s been the industry leader in innovation for the past 30 years, with no sign of stopping anytime soon!
So let’s celebrate 30 years of Photoshop by looking at 30 tips and tricks that all Photoshop users should know!
30 Tips & Tricks All Photoshop Users Should Know
1. Select Colors From Anywhere
Stop screenshotting things just to grab colors from them! Simply select the Eye Dropper tool, minimize Photoshop, click the dropper onto your canvas, and then drag anywhere outside of Photoshop!

2. Install Custom Photoshop Brushes
Don’t feel tied to using just the brushes that come pre-installed in Photoshop. Try installing one of the thousands of brushes the internet has to offer by going into your bushes, clicking the Gear icon, and choosing Import Brushes.

3. How to Create a Rain Texture
Falling raindrops are a great way to add some drama to your photography, but sometimes nature doesn’t agree with your plans. Make it rain yourself by creating a new layer filled with black, adding some Noise, then a slanted Motion Blur, and finally set the layer to Screen! Add some contrast, and you have instant rain.

4. Create a Quick Light Bleed Effect
Add a subtle light bleed to help blend any image by creating a new layer, and painting white towards the top of your image using a big fluffy white brush. Finish it off by lowering the opacity of the layer!

5. How to Use Blend If
Use Blend If to blend anything onto everything by double-clicking the layer you’d like to blend, going down to Blend If, and while holding Shift, playing with the sliders! The topmost layer will start blending into the layers below.

6. How to Copy Layer Styles Quickly
Have a layer style you need to apply to several other layers? Hold down the Alt key and drag the FX icon from the original layer to the target layers. The layer styles will be applied instantly—no need to fiddle with settings!

7. How to Create Multiple Stroke Effects on Text
Why have one line stroke when you could have two? Double-click the text layer to apply a Stroke layer effect. Press the Plus icon to add another Stroke. Add as many as you’d like!

8. Make a Trendy Double Exposure Effect
Create an easy double exposure effect by getting one high contrast black and white image, and then clipping a second image into it. Set the second image to Screen. The real magic is in the clever composition.

9. How to Merge Shapes
Create quick custom shapes using the shapes you’ve already created by selecting your shape layers and then Right-Click > Merge Shapes. Bam! Now multiple shapes have become one!

10. How to Use Motion Blur
Use Motion Blur to give some speed to any object by creating a feathered selection around the edges of an object and then adding a subtle Filter > Blur > Motion Blur.

11. How to Create Instagram Photo Filters
Want the Instagram filter without having to log in to Instagram? Create a mustard-yellow Color Fill layer and then set it to Multiply. Instant vintage effect! Add some red on a layer set to Screen for added faded glory.

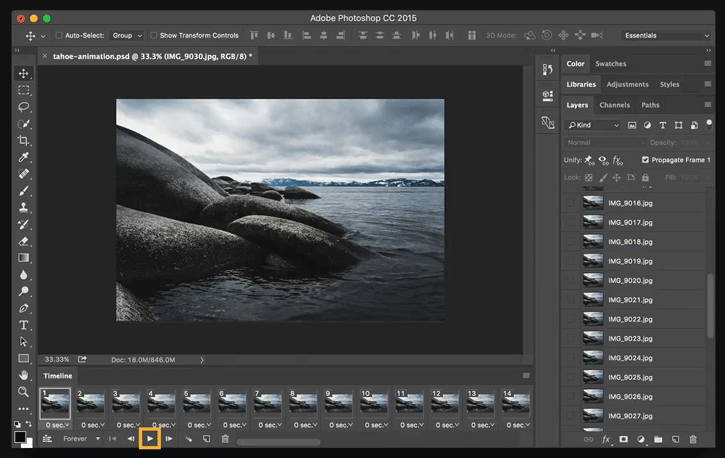
12. How to Create an Animation in Photoshop
Did you think Photoshop is just for image editing? Think again! Go to Window > Timeline and click on the Create Video Timeline icon to create GIFs and other simple animations!

13. How to Warp Text in Photoshop
With your text layer selectedand the Type Tool active, look towards the top-right of the Type Tool’s toolbar. You will see an icon of a “T” with a curved line underneath. Hit that icon to see a slew of built-in text arcs and bends!

14. How to Change a Brush’s Flow Rate
Having trouble blending your shadows? Select the Brush, look up to the top toolbar, and lower the brush’s Flow. Now, each pass of the brush will slowly build up color, perfect for shading and lighting!

15. How to Paint Makeup
Forgot to hire a makeup artist for your shoot? No worries! Create a new layer, set it to Soft Light, and paint in the eyeshadow yourself! The Soft Light and Overlayer layer modes will turn you into a post-production makeup artist pro.

16. How to Make a Frequency Separation Photoshop Action
Do you ever wonder how photographers get that perfect high-fashion skin? It’s called frequency separation! Split your image into two layers, one with a Gaussian Blur and the other with a High Pass filter. Set to Linear Light. Use the blurred layer to fix the color and skin tone and the high pass layer to fix the texture!

17. How to Use the Blur Gallery
Add more depth to your photos by blurring the background. Duplicate your image, and then go to Filter > Blur Gallery > Field Blur. Set your blur, and then mask out your subject, so that they are no longer blurred, but their background is. Instant depth!

18. How to Create Chromatic Aberration
Miss the old days of broken VHS tapes or glitchy 90s computer monitors? Duplicate your layer, double-click the layer, uncheck the R channel, and then move the layer over by 3-5 pixels. Finally, grab your 3D glasses!

19. How to Quickly Change Brush Size and Hardness
Did you know that you can use the square bracket keys [ and ] to change the size of your brush? You can also hold down Shift while tapping the bracket keys to change the hardness of the brush! All without having to visit the Brush panel!
20. How to Create a Smart Object
Layers automatically become Smart Objects when brought into Photoshop, but did you know you can turn any layer into a Smart Object? Start using this non-destructive editing powerhouse by right-clicking the layer and choosing Convert to Smart Object.


Leave a comment